Instruments Setup
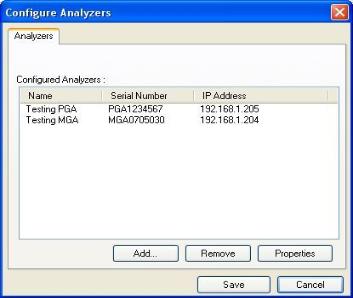
This menu option will allow the user to set up a PGA or MGA instrument for the SSi XGA Viewer software. Clicking on this menu option will display the Configure Analyzers screen, from which the user can add, modify, or delete an instrument.

Figure 19 - Configure Analyzers window
This screen will display all of the instruments that have been set up through the SSi XGA Viewer software. The instrument’s Name, Serial Number, and IP Address will be displayed in the “Configured Analyzers” area.
Add An Instrument
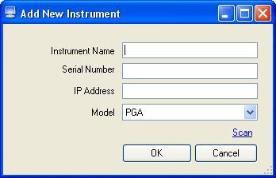
Click on the Add button to add an instrument. This will display the Add New Instrument screen.

Figure 20 - Add New Instrument window
The instrument setup contains four fields:
-
Instrument Name – This is the name for the instrument. This name will be the referenced name for the instrument throughout the SSi XGA Viewer software.
-
Serial Number – This is the serial number from the instrument. The serial number can be found on the About/Sign On screen on both the PGA and the MGA (Menu Option 10).
-
IP Address – This will be the IP address for the instrument. The IP address can be found on the Set IP Address screen on both the PGA and the MGA (Menu Option 26).
-
Model – This is the model type of the instrument. The model can be either PGA or MGA.

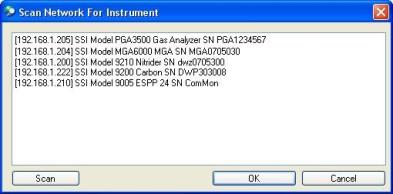
Figure 21 - Scan window
If all of the fields are known, the user can manually enter the information in. Note: Data from the instrument is stored on the local computer by Serial Number, so it is very important that the serial number entered is correct. However, the Scan link will scan the available network and will display any SSi instrument located on that network.
When the screen is first displayed, it will automatically begin a scan of the network. To manually begin a scan of the network, click on the Scan button. Note: The user will be unable to make any changes to the software while a scan is in progress. A typical scan will only take a few seconds. Note: If there are any other SSi instruments located on the network being scanned, such as a 9200 controller, these instruments will be displayed as well. Select the desired instrument by clicking on that instrument (the selected instrument will be highlighted in blue) and click on the OK button. The fields from the Add New Instrument screen will be populated with the appropriate information. The Instrument name will be filled in unless the user has inserted some text already. This name can be changed if desired. Once all four fields are populated with the appropriate data, the user can click on the OK button to add the instrument, or the Cancel button to cancel the add process. The “Configured Analyzers” area will be re-populated to reflect the changes.
Remove An Instrument
To remove an instrument from the SSi XGA Viewer software’s setup, select the desired instrument from the “Configured Analyzers” list and click on the Remove button. This will delete the selected instrument from the software’s setup. Note: Removing an instrument will not delete the actual logged data from the SSi XGA Viewer’s installation folder.
Modify An Instrument
To modify an instrument in the SSi XGA Viewer software’s setup, select the desired instrument from the list and click on the Properties button. This will display the Properties screen, which is identical to the Add New Instrument screen in both form and function. Modify the desired information and click on the Save button to save the information, or the Cancel button to cancel the modification.
Once all of the necessary instruments have been added, deleted, or modified, click on the Save button to save these changes, or click on the Cancel button to cancel all of the changes.