SDS Reporter Versions 1.101.0.76 and above
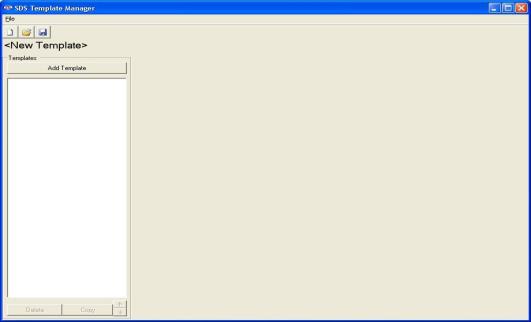
The purpose of a template is to save the users time by filling in some of the more generic survey data. For example, the user could create a template for one customer, including company name, TC type, etc; then when the survey is run using this template, this information is already present and it won’t need to be entered for each survey run for that customer. The new SDS Template Manager (figure 3.18) allows the user to see all of the templates currently stored on the SDS instrument, as well as any templates saved to a local computer. The Template Manager also allows the user to create new templates and save them to a local file on a computer or network, or to the SDS instrument.

Figure 3.18 New SDS Template Manager
Description/Function of Template Manager Screen buttons/menu options
This section will describe the function of the toolbar buttons and menu options for the Template Manager Screen. Clicking on either the form button or the menu option will produce the same result, so each pair of button/menu option will be explained in this section.
New Button / File è New
The New button,  , or New menu option will allow the user to create a new set of templates. The maximum number of templates that can be added per file is 32. Note: initially, there are no templates in the file.
Open Button / File è Open
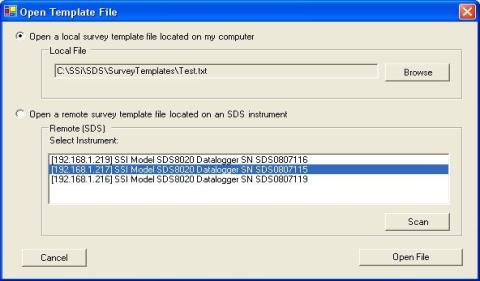
The Open button,  , or the Open menu option will allow the user to open an existing template file either from the local computer, or from an SDS instrument on the network (figure 3.19).

Figure 3.19 Open template menu option
The use will be able to open a local template file or a template file that is on an SDS. If the user selects a local file, the user will be able to click on the Browse button to select the file to open. The SDS software will display a common Windows dialog box for the user to select which file to open. If the user selects an SDS instrument, the SDS Software will display a selection box with all of the available SDS instruments on the network. Note: Since the SDS software is searching the network for all SDS devices, it may take a couple of minutes for the selection box to be displayed. This list will be populated with all of the available SDS devices found when the “Open Template File” screen is first opened. Clicking on the Scan button will allow the user to re-scan the network for available SDS instruments. Once a local or remote file has been selected, click on the Open File button to open the file, or click on the Cancel button to close down the screen without opening a file. Note: When the Open Button or the Open menu option is clicked, the tabs that contain all of the fields for the template will not become visible – an individual template must be selected to view the tabs. Once the file has been loaded, the filename will be listed above the Templates list on the left of the form (figure 3.18).
Save Buttons / File è Save
The Save button,  , or Save menu option will allow the user to save the current file back to the local machine or the SDS instrument. Note: Any changes made to any template will be saved at once when this option is selected. Note: If the user is working with a new template file, the Save function will act like the Save As function (see below section).
File è Save As
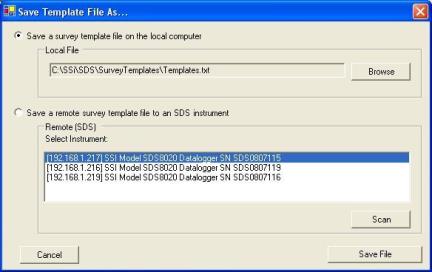
This option acts the same way as the Save option, only it will display a dialog box that will allow the user to select the file to save (figure 3.20). This functionality of this screen is similar to the Open Template screen (figure 3.19). The template file can be saved locally on a computer or remotely on an SDS instrument. If the user selects to save the file locally, the user will be able to click on the Browse button, which will display a common Windows save dialog box. The user will be able to select the location and give the template file a name. If the user selects to save the file to a remote SDS, the software will display a selection box with all of the available SDS instruments on the network. Note: Since the SDS software is searching the network for all SDS devices, it may take a couple of minutes for the selection box to be displayed. This list will be populated with all of the available SDS devices found when the “Save Template File As” screen is first opened. Clicking on the Scan button will allow the user to re-scan the network for available SDS instruments. Once a local file or remote file has been selected, click on the Save File button to save the file, or click on the Cancel button to close down the screen without saving the file.

Figure 3.20 Save Template File As screen
The software will always display a message box with the success or failure of the save.
Exit Button / File è Exit
This option will close the Template Manager screen.
Add Template Button
This option will add a template to the collection of templates stored in memory, up to 32 total templates. The only required field is the Template Name. The default template name is <Template Name>
Once a template has been added, the new template will be loaded into the fields.
Delete Button
This option will delete a template from the collection of 32 templates stored in memory.
Copy Button
This button will copy a template into the collection, assuming there are less than 32 templates already. This would be useful if the user only wanted to change one or two items on the template, such as the setpoint.
Arrow Buttons
The arrow buttons next to the Copy button will allow the user to change the order of the templates in the file. This way, the more commonly used templates can be kept at the top of the file so the user will not have to scroll down to see the template on the SDS. The up arrow button will move the template up one position, and the down arrow button will move the template down one position.