Connecting The SDS Data Logger To A Network
Every SDS Data Logger shipped includes an Ethernet crossover cable that will connect the data logger to a network. Once the data logger is connected to a network, the SDS Reporter software will be able to find it during any searches.


If you are connecting the data logger to your network, you will need an Ethernet cable (the cable provided is a crossover cable for direct connections to a PC). The cable is plugged into the data logger Ethernet plug and then other end should be plugged into a network hub. If the IP Address of the data logger needs to be changed, this can be done on the data logger through the Set IP Address menu option.
If you are not putting the data logger on the network, you should use the Ethernet crossover cable that has been provided with the device. Ethernet crossover cables are most often used when connecting two Ethernet computers without a hub. An Ethernet crossover cable has it's send and receive wires crossed. When using a hub or switch, this is automatically done for you.
With a crossover cable, you are forming a network between the computer that you are directly plugged into and the data logger. There will be some network settings on the computer that you will have to configure for the 2 devices to communicate. The data logger will have the network setting already setup with the following IP address – 192.168.1.215. This can be modified through the Set IP Address screen on the data logger.


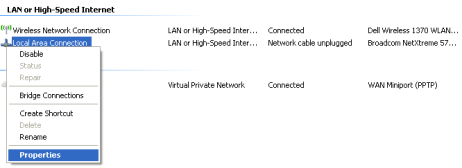
Network settings can be found through the Control Panel in Microsoft Windows. By selecting Network Setting, the operator will be given a list of the current available connection types. Using the crossover cable will require the Local Area Connection as seen in the below diagram to be modified. The Properties can be changed by highlighting the connection and using the right mouse button to click and select the Properties tab or by highlighting the connection and clicking on Change setting of this connection.

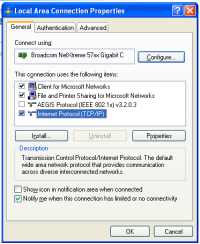
Once the Local Area Connection Properties screen is displayed, the Internet Protocol (TCP/IP) tab should be highlighted. Click the Properties button to display Internet Protocol (TCP/IP) Properties.
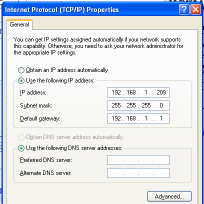
On the Internet Protocol (TCP/IP) Properties tab, you will need to select the option for Use The Following IP Address. Enter in the following data on these fields.
IP Address: 192.168.1.209
Subnet Mask: 255.255.255.0
Default Gateway: 192.168.1.1
To change the network settings on your computer you may need addition information so please refer to the computer manual.