22. Input Calibration

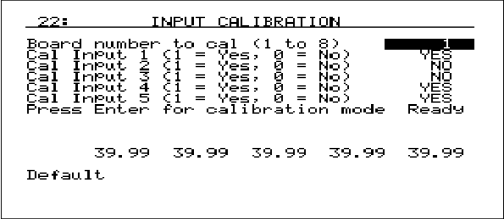
This screen displays information to setup the calibration of the inputs. Calibration can be performed 1 channel at a time or from 1 – 5 inputs per board. The user can select board one through eight. The user can also individually select each input (one through five) to calibrate, where 1 = yes (calibrate) and 0 = no (do not calibrate). To continue the calibration setup, scroll down to the “Press Enter for calibration mode” line and press Enter. This will display the setup for the calibration mode.

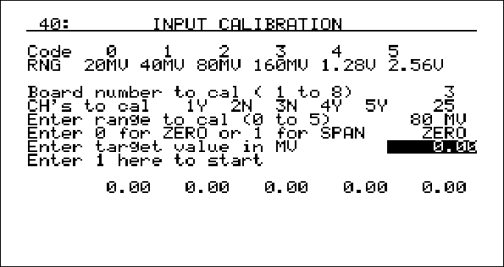
The top of the screen displays the codes for the ranges. The codes are:
0 – 20MV 1 – 40MV 2 – 80MV 3 – 160MV 4 – 1.28V 5 – 2.56V
Below is a listing of the suggested ranges for the various TC types.
TC Type mV Range Chart
TC Type Range in mV
B 20
C 40
E 80
J 80
K 80
N 80
NNM 80
R 40
S 20
T 20
To select a board to calibrate, highlight the first line (“Board number to cal (1 to 8)”), enter the desired board number that will be calibrated, then press Enter. The next line is the TCs (CH = Channels) to calibrate. If there is a Y next to the TC, then it will be calibrated. If there is an N, then the TC will not be calibrated. To select the TCs to calibrate, enter a number between 0 and 31. To determine the number, follow these steps:
TC1 has a “value” of 1, TC2 has a “value” of 2, TC3 has a “value” of 4, TC4 has a “value” of 8, and TC5 has a “value” of 16.
A TC that is on has a value of 1. A TC that is off has a value of 0.
Multiply the TC’s value by its “value” and add all 5 TC values up.
For example, we wish to calibrate TC1, TC4, and TC5. TC1 = 1 (1 * 1), TC2 = 0 (0 * 2), TC3 = 0 (0 * 4), TC4 = 8 (1 * 8), and TC5 = 16 (1 * 16). The number to enter would be 1 + 0 + 0 + 8 + 16 = 25. The line will now look like this: CH’s to cal 1Y 2N 3N 4Y 5Y.
To select the range to calibrate, select one of the codes above (0 through 5) and press Enter. The mV ranges displayed above are ideal because they cover the mV range for the selected thermocouple type.
On the next line, enter a 0 for ZERO or a 1 for SPAN. Enter the target value (in MV) as a value ranging from 0 to 320. The SPAN value should be 90% of full scale. That means for 80mV, the span value should be 72mV. Scroll down to the next line and enter 1 to start the calibration. DO NOT START THE CALIBRATION until you have entered the proper value in the calibration device. Also be sure that the polarity of the wires is hooked up properly.
When the calibration is finished, the “Enter 1 here to start” line will read “Ready 0”. Pressing ESC will display the Input Calibration first screen (menu option 22).
The calibration process can be run multiple times and if initial calibration is off significantly, running multiple times is recommended.