Calibration
This menu option allows the operator to calibrate each input on the DR recorder.
Calibrate Analog Inputs
NOTE: Use the Analog Input Type Setup function to set Analog Input Types prior to calibration.
Highlight “Calibrate Analog Inputs” from the first Calibration screen and tap
 . Select the module you want to calibrate from the list and tap
  .
.

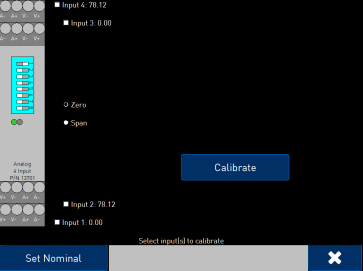
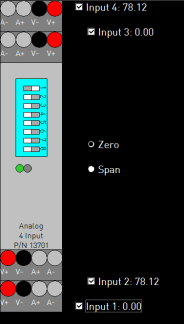
The main calibration screen includes a diagram of the selected module, checkboxes representing each input, and a Zero/Span selector. The inputs will also display readings if applicable.

Tapping the input name will select the checkbox. It will also highlight the connections to be used for calibrating the inputs as shown.
NOTE: Only inputs with like ranges can be calibrated simultaneously.
Select the inputs to calibrate. The screen will now direct you to source the appropriate input:

Connect as directed. Make sure that “Zero” is selected (always run Zero Calibration before Span Calibration) and tap “Calibrate” to begin.
The progress bar and countdown will display the progress of the calibration.
When completed, select “Span.” The screen will now direct you to source the appropriate span input:

Connect as directed and tap “Calibrate” to begin.
The progress bar and countdown will display the progress of the calibration.
When completed, check that your readings are accurate. If readings seem significantly off, it may be beneficial to use the “Set Nominal” feature. This will restore factory defaults and allow you to attempt a new calibration.
After completing the Analog Input Calibration, perform an analog input trim as follows:
Trim Analog Inputs
NOTE: Use the Analog Input Type Setup function to set Analog Input Types prior to calibration.
Highlight “Trim Analog Inputs” from the first Calibration screen and tap
 . Select the module you want to calibrate from the list and tap
  .
.
The main trim screen is similar to the main calibration screen, with the addition of a “Enter Signal” button.
Tapping the input name will select the checkbox. It will also highlight the connections to be used for trimming the inputs as shown (these should already be connected if you just performed a zero/span calibration).
NOTE: Only inputs with like ranges can be trimmed simultaneously.
Select the inputs to trim. Tap “Enter Signal” and select the source you will be inputting. When ready, tap “Calibrate” to begin.
The progress bar and countdown will display the progress of the calibration.
Repeat as needed for all desired inputs.
When completed, check that your readings are accurate If readings seem significantly off, it may be beneficial to use the “Set Nominal” feature.