Dew point reading shows +80°F (or a high reading) and never drops:
The upper range of the sensor is +80°F (27°C). If that value is displayed, it likely indicates the presence of moisture in the sample tubing or on the dew point sensor tip. If this moisture is not removed, it will cause the sensor tip to corrode and will eventually require the sensor to be replaced.
First, check the dew point sensor tip for obvious signs of moisture, corrosion, and/or damage causing high readings. Remove power from the DP2000. Make sure that it is not plugged into a power source and that the POWER switch is off. Open the case by loosening the Allen head screw located in the bottom of the face plate (Figure 8). Loosening this screw requires a 1/8” Allen wrench. Lift up the face plate, but be careful of the wires connecting the face plate to the case (Figure 9).
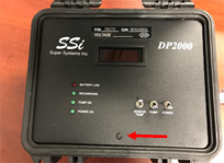
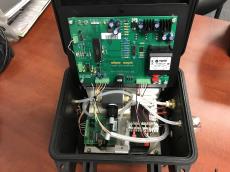
Figure 8 Figure 9
Loosen the black plastic compression fitting that holds the dew point sensor (Figure 10).

Figure 10
Pull out the sensor and visually inspect it for visible moisture. Older units use a sensor shown in Figures 11 and 12. New units use a sensor shown in Figure 13. The older sensor has a plastic protective end that can be unthreaded and removed for a more close examination. Removing the protective end exposes a mirror and wire leads around it. The newer sensor has an aluminum protective cover that cannot be removed. Look for signs of visible moisture on the sensor or any other signs of contamination due to prolonged exposure to moisture.
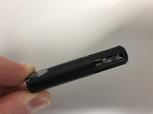
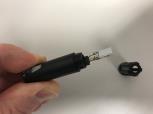
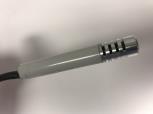
Figure 11 Figure 12 Figure 13
Some examples of sensor damage due to prolonged exposure to excessive moisture on an older model sensor are shown below (Figures 14 – 16).
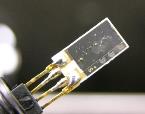
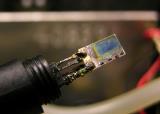
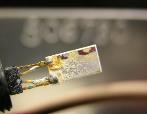
Figure 14 Figure 15 Figure 16
Water droplets present on the mirror indicates that the sensor has been exposed to excessive moisture at some point. That moisture needs to be removed. DO NOT ATTEMPT TO REMOVE THE MOISTURE FROM THE SENSOR WITH A CLOTH OR COMPRESSED AIR AS THIS CAN PERMANENTLY DAMAGE THE SENSOR. There are a few ways to remove the moisture from the sampling lines and DP2000. The method used will depend on how much time the user can afford to be without measurements from the DP2000 analyzer.
Drying out the Model DP2000:
The easiest way to remove moisture is to flow dry compressed air*, nitrogen, or argon through the analyzer, until the dew point reading drops and stabilizes. This can take up to two days depending on the amount of moisture in the sampling lines and analyzer.
*Dry compressed air is compressed air produced by a facility air compressor that has flowed through a desiccant or refrigerated air dryer with a dew point of 40°F (4°C) or less.
The in-line filter is the first place where moisture tends to collect. Upon examination, there may not be any visible moisture in the filter element, but there may still be a significant amount of moisture in the element. Remove the in-line filter and replace it. This will help reduce the time required to dry out the DP2000.
With the filter element replaced, test the DP2000 to see if it is operating properly. Verify the ambient dew point against a web-based weather station that will report the ambient dew point for your area. If the displayed reading is within three degrees (3°) of the reported dew point when the instrument is taken outside, then all of the moisture has probably been successfully removed. The wet filter and sample tubing can be re-attached after they have been completely dried out. The filter element will regain all of its original filtering properties after it has dried out.
Option 1:
Connect a dry gas source to the sampling line of the DP2000. Verify that the pressure is low (less than 2 psi) to prevent damage to the dew point sensor. Adjust flow through the DP2000 to 1.5 to 2 CFH of flow indicated by the flow meter on the side of the DP2000. Allow gas to flow through the unit and monitor the dew point reading from the sensor. As the sample line and sensor dry out, the dew point reading should drop and stabilize.
Option 2:
Moisture can be removed from the sampling line much more quickly if the lines are disconnected and blown out with dry compressed air, nitrogen, or argon. Below are steps to remove moisture with that method.
Isolate the sampling line from the atmosphere gas source to the DP2000 sample inlet by disconnecting it on both ends. Higher pressures can be used for this process as long as the lines have been disconnected at both ends and no sensing equipment or filters are exposed to the high pressure gas. Blow gas through the sampling line for as long as it takes to remove any visible moisture from the line. Reconnect the line at both ends.
Lift the face plate of the DP2000 (reference Figure 8 & 9) and disconnect the tubing between where the sample gas enters the unit and the Sensor Sampling Block. Blow gas through the sampling line for as long as it takes to remove any visible moisture from the line. Reconnect the tubing at both ends.

Figure 17
Remove the dew point element from its housing by loosening the compression nut (reference Figure 10). Visually inspect the element for any signs of moisture. If there is any moisture on the element, low pressure gas must be flowed past the element, until the element is dry. DO NOT ATTEMPT TO REMOVE THE MOISTURE FROM THE ELEMENT WITH A CLOTH OR COMPRESSED AIR AS THIS CAN PERMANENTLY DAMAGE THE ELEMENT.
With the element out of its housing, disconnect the tubing on both ends and blow gas through the housing, until all of the moisture has been removed (Figure 18). A dry cloth or paper towel can also be used to remove moisture from inside the housing. Reconnect the tubing and reinstall the dew point element.

Figure 18
Remove the tubing at both ends between the dew point element housing and the inlet of the sample pump (Figure 19). Blow out the tubing to remove the moisture. Reconnect the tubing.

Figure 19
Remove the tubing at both ends between the sample pump outlet and the inlet of the flow meter (Figure 20). Blow out the tubing to remove the moisture. Reconnect the tubing.

Figure 20
Visually inspect the flow meter for signs of moisture in the flow tube where the black float is located. If necessary, blow dry gas through the flow meter, until all of the moisture is removed. Reconnect the tubing.
Disconnect the tubing between the flow meter and sample gas outlet at the top of the Simple Dew housing. Blow out the tubing with dry gas, until all of the moisture is removed. Reconnect the tubing.

Figure 21
To test if it is operating properly, verify the ambient dew point against a web-based weather station that will report the ambient dew point for your area. If the displayed reading is within three degrees (3°) of the reported dew point when the instrument is taken outside, then all of the moisture has probably been successfully removed. The wet filter and sample tubing can be re-attached after they have been completely dried out. The filter element will regain all of its original filtering properties after it has dried out.
To prevent the possibility of moisture damaging the instrument, be sure that the measured dew point is below ambient levels before it is stored. If necessary, dry compressed air, nitrogen, or argon can be used to purge the instrument after use.
If the DP2000 still reads 80°F (27°C) after completing the procedure to dry out moisture, please contact Super Systems, Inc. at 513-772-0060 for more technical support as the sensor is likely damaged and will need to be replaced.