Storing Test Results
Leave the wire coil attached to the binding posts for 30 to 45 seconds. During this time, the % Carbon reading will likely fluctuate. This is expected and is not an error. After 30 to 45 seconds, press the  button to save the setting to the CAT-100’s internal storage.
Depending on which options are enabled in the Test Enables menu, a series of screens will appear. If one or more of these options are NOT enabled in the Test Enables menu, that screen(s) will NOT appear.
Test ID Entry (Figure 16). This screen gives you the ability to enter an identification number for the test data that you are saving. When finished, press ↵ to continue.
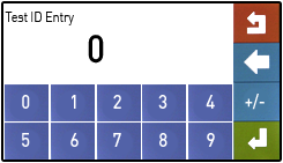
Figure 16 - Test ID Entry
Furnace # Selection (Figure 21). With this screen, you may select a furnace number to associate with the saved test data. Furnace names may be edited in the CAT-100 PC software; see the View Furnaces section for more details. Selecting this option will display the list of Furnace Names that can be applied to a test result when the test result is being saved on the CAT-100. The maximum number of furnace names is 16; the maximum number of characters for each name is 32.
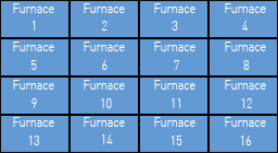
Figure 21 - Furnace # Selection
Operator # Selection (Figure 17). With this screen, you may select an operator number to associate with the saved test data. Operator names may be edited in the CAT-100 PC software; see the View Operators section for more details. The maximum number of operator names is 16; the maximum number of characters for each name is 32.
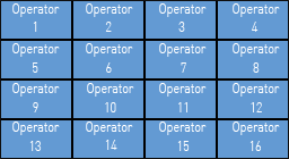
Figure 17 - Operator # Selection
Enter probe data (Figure 18). Using this screen, probe data may be saved with the test data: % Carbon (“%C”), millivolts (“MV”), thermocouple number (“TC”), and CO Factor (“COF”). Pressing each button associated with a field will bring up a numeric keypad that will allow you to enter the appropriate value for that field. When finished entering values, press ↵ to continue.
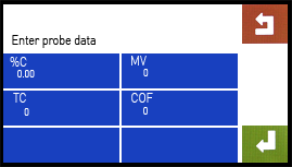
Figure 18 - Probe data entry
Enter date and time of test (Figure 19). This screen contains buttons allowing you to enter the Year, Month, Day, Hour, and Minute of the test. You may also accept the default values shown. When finished entering values, press ↵ to continue.
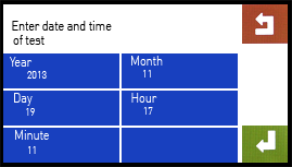
Figure 19 - Entry of date and time of test
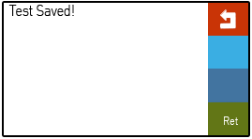
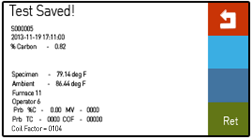
The screen will read “Test Saved!” (see Figure 20) when the test data has been saved. A summary of the data saved will then be shown (Figure 21) before the main menu is again displayed.
|
Figure 20 - "Test Saved!" initial screen |
Figure 21 - "Test Saved!" summary screen |
Once the data has been saved appropriately, remove the wire coil from the binding posts. Discard the wire coil in a proper manner. To prevent errors in test results, it is important not to reuse a coil that has already been used.