Appendix B – Guide to Building a Recipe
The SSi 9220 is a multi-loop programmable vacuum recipe controller. The 9220 can control multiple loops (partial pressure vacuum level, vacuum setpoints, temperature) and has several assignable relay outputs (Events, End Of Cycle, Alarms, etc…) that can be set up in a recipe to process work.
Things to understand before creating recipes:
-
Know how the furnace works. Have an understanding of not only what is happening to the work but also how the furnace operates.
-
Know the limitations of the furnace.
-
Know what should be accomplished with the recipe.
Sample Recipe Structure for a 9220 for a Single Chamber Vacuum Furnace
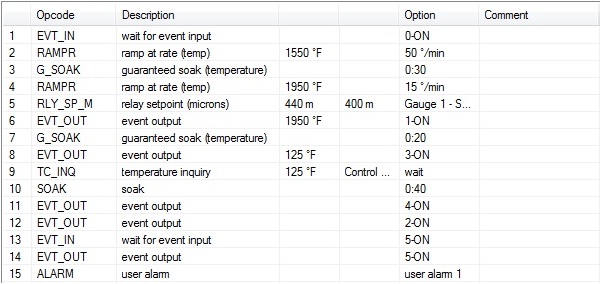
The Recipes in the 9220 operate from the top to the bottom. This means that if something happens in Step 4, but the recipe is in Step 2, the operation for Step 4 will not turn on until that point is reached. This also means that if the recipe is in Step 4, anything from Step 1 through Step 4 is currently active, on, or present, unless it has been turned off within the recipe or turned off manually.
What is going on in this recipe?
-
Most likely, the furnace is already in a “Cycle Running” condition, from a Cycle Start button being pressed or some other variable that has started this furnace into cycle. In Step 1, the recipe is waiting on an event input to turn on. It appears that this event input is a heat enable input (vacuum level achieved, heating system active, etc…). The recipe continues to Step 2.
-
In Step 2, the recipe is setting the Temperature . This particular recipe is ramping the furnace at a controlled rate to 1550°F. The recipe continues to Step 3.
-
In Step 3, the recipe is doing a guaranteed soak. This means that the furnace has to be at the Setpoint or within its Deviation Band for the soak timer to time out. The recipe then continues to Step 4.
-
In Step 4, the recipe is again setting the Temperature. It is again ramping the furnace at a controlled rate to a temperature. The recipe continues to Step 5.
-
At Step 5, the recipe is setting the partial pressure range. This range is the control range of a vacuum level that the controller will attempt to maintain in the furnace. Once the range is specified, the recipe continues to Step 6.
-
Step 6 in the recipe is calling for a partial pressure in the furnace. Most likely, one of the assignable relay outputs is assigned as a partial pressure control relay. This relay will be energized between the range specified in the recipe at Step 5 and de-energized outside of the range specified in the recipe. Once this output turns on, it continues to Step 7.
-
Step 7 is another guaranteed soak in the furnace. Once the soak timer has timed out, the recipe will advance to Step 8.
-
The recipe has now entered into quench. The recipe has set the furnace temperature to 125°F, and has turned on an event output. This event output is most likely tied to a series of logic that will turn on cooling water, turn on the cooling fan, close the vacuum valve, turn off the vacuum pump, etc…
-
Step 9 of the recipe is a TC Inquiry. This verifies that the furnace temperature has achieved its temperature setpoint before advancing.
-
In Step 10, the controller is again in a soak segment. This is to ensure that the load has properly cooled through. Once the quench time is complete, the recipe advances.
-
Since the next few steps are event outputs, the controller will advance rather rapidly until it gets to the step for the Event Input, where it will wait for something to happen. Most likely, Step 11 and Step 12 are outputs that are ending the quench, and opening up the vent valve in the furnace so that the furnace pressure will equalize to the outside air.
-
In Step 13, the recipe is in an Event Input. It is most likely waiting for the furnace to be vented. This could be through a 1 atmosphere switch. This step could also be done with a Delay Timer instead of an Event Input, if the time to vent the furnace is known.
-
In Step 14, the recipe is mostly complete. The furnace has vented, so most likely this step is turning on the work bell to let the operator know that the recipe has completed.
-
Step 15 is holding the work bell on until the operator can come to the furnace, acknowledge that the work is done, and unload the work from the furnace. Once the Alarm has been acknowledged (by pressing the Acknowledge button on the screen), the recipe has completed.
Sample Recipe Structure for a 9220 for a Multi Chamber Vacuum Furnace

The Recipes in the 9220 operate from the top to the bottom. This means that if something happens in Step 4, but the recipe is in Step 2, the operation for Step 4 will not turn on until that point is reached. This also means that if the recipe is in Step 4, anything from Step 1 through Step 4 is currently active, on, or present, unless it has been turned off within the recipe or turned off manually.
What is going on in this recipe?
-
In Multi-Chamber vacuum furnaces, the hot zone of the furnace is usually kept at a hot temperature to minimize downtime in running the furnace. At this point, the furnace is most likely in an Automatic running condition. The work has been loaded in a loading zone of the furnace, and the sequence that matches the vacuum levels to allow the work to transfer into the hot zone has already been started. The recipe is selected and ran.
-
Step 1 starts the recipe by setting the furnace temperature to 1250°F.
-
In Step 2, the recipe is turning on an event output. This could be telling the motion sequence that the hot zone (and recipe) is ready for work, which will also allow the work to be transferred into the hot zone.
-
In Step 3, the recipe is waiting on an event input. This is most likely some sort of trigger that the work is transferring. This event input holds the recipe so that if the transfer sequence takes some time (chambers to pump down and equalize, valves opening and closing, doors opening and closing, etc…), the recipe will not have already advanced and starting timing out.
-
In Step 4, the recipe is again setting the Temperature, however the recipe has a wait condition. Since the cold load will drag the temperature of the furnace down, the recipe should not continue until the furnace temperature has recuperated. Once the furnace temperature has come back to setpoint, the recipe will advance to Step 5.
-
At Step 5, the recipe is setting the partial pressure range. This range is the control range that the controller will attempt to maintain of a vacuum level in the furnace. Once the range is specified, the recipe continues to Step 6.
-
Step 6 in the recipe is calling for a partial pressure in the furnace. Most likely, one of the assignable relay outputs is assigned as a partial pressure control relay. This relay will be energized between the range specified in the recipe at Step 5 and de-energized outside of the range specified in the recipe. Once this output turns on, it continues to Step 7.
-
Step 7 is a soak segment in the recipe. Once the soak timer has timed out, the recipe will advance to Step 8.
-
The recipe has completed is timing/temperature portion, and has now progressed to move the work out of the hot zone and into the next appropriate zone. Step 8 and Step 9 are most likely telling the motion control that the work is complete in the hot zone and where to move the work (oil quench, gas quench, etc…). This step could also ring a work bell that will tell the operator that the work is done in the hot zone so that they may watch the work transfer, press an acknowledge button that will allow the work to transfer, etc…
-
Step10 of the recipe is another event input, the same as used above in Step 3. This is most likely to hold the conditions of Step 8 and Step 9 on until the work has started to move to the correct location. Once Step 10 has completed, the recipe is complete.
Sample Recipe Structure for a 9220 for a Vacuum Temper Furnace

The Recipes in the 9220 operate from the top to the bottom. This means that if something happens in Step 4, but the recipe is in Step 2, the operation for Step 4 will not turn on until that point is reached. This also means that if the recipe is in Step 4, anything from Step 1 through Step 4 is currently active, on, or present, unless it has been turned off in the recipe, or manually.
What is going on in this recipe?
-
In a Vacuum Temper Furnace, the sequence usually starts by an operator pressing a Cycle Start button. This initiates a sequence that pumps the furnace down to a certain vacuum level, then backfills the furnace to a slightly positive pressure of some gas (Nitrogen, Hydrogen, Argon, etc…) and enables the heating circuit. In this case, the 9220 Controller is most likely setup so that the recipe will not run until this sequence has completed.
-
Step 1 starts the recipe by setting the furnace temperature with a controlled ramp rate. Once the recipe has controlled the temperature up to its setpoint, the recipe will advance to Step 2.
-
In Step 2, the recipe is verifying the actual temperature in the furnace. If the actual temperature is at setpoint or within a deviation band of the setpoint the recipe will advance to Step 3.
-
The recipe is in a soak at Step 3. After the soak timer has completed, the recipe will advance to Step 4.
-
In Step 4, the recipe has gone into a cooling or quench segment. The recipe has set the temperature to 200°F and has turned on an event output. This event output is most likely turning on the cooling/quench sequence.
-
At Step 5, the recipe is verifying that the furnace temperature has achieved its cooled setpoint. Once it has been reached, the recipe will progress.
-
In Step 6, the recipe is turning off the cooling/quench output.
-
By Step 7, the work has completed processing. This step is most likely turning on a work bell and preventing the furnace from running again until the next load is ready.
-
Step 8 is holding the work bell on until the operator can come to the furnace, acknowledge that the work is done, and unload the work from the furnace. Once the Alarm has been acknowledged (by pressing the Acknowledge button on the screen), the recipe has completed.
Building a Recipe
Recipes can be built through the 9220 touchscreen interface or through SSi Configurator. This guide will use Configurator, but the touchscreen interface functions in the same manner.
Start by opening Configurator. Log in by clicking the padlock icon
 in the upper left hand corner of the screen. After logging in, the padlock icon will change color, signifying a successful login.
To start to build or modify recipes, click the Recipe Editor icon
 in the upper left hand corner of the screen.
 The Recipe Editor will open.
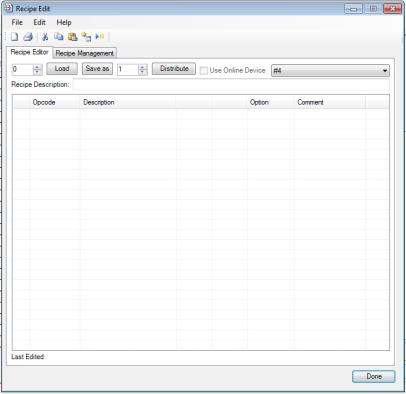
First, start by choosing the correct Recipe Group. To do this, click the drop down box near the upper right hand corner of the screen.

Once the correct recipe group has been selected, type or click the Up or Down arrows in the Load Entry Box, near the upper left hand corner to change the number.

Once the correct recipe number is selected, click the Load button. If a recipe has already been created under that recipe number, it will appear in the Recipe Box. If a recipe has not yet been created, the Recipe Box will remain empty. In the example seen below, a recipe has already been created for Recipe #12.

Before adjusting the recipe, the operator must first understand what needs to be modified. For example, if the temperature needs to be adjusted at the beginning of the recipe, double click on the line for SETPT. The SETPT Edit Step box will appear.
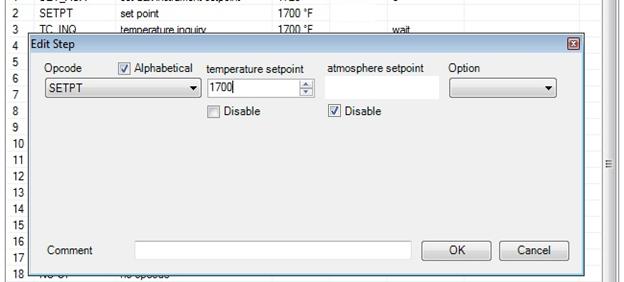
Under the Temperature Setpoint text in the upper middle portion of the Edit Step box, there is a numeric entry box. To modify this setpoint, either the Up or Down arrows can be pressed, or the desired temperature can be entered into the box from a keyboard. Once the correct setpoint has been entered, press the OK button in the bottom right corner of the Edit Step box.
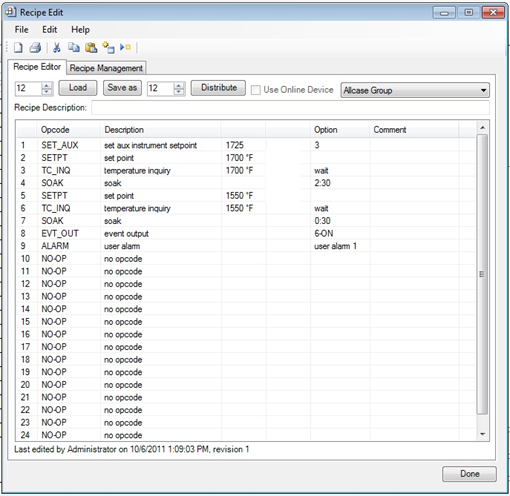
Here, the Temperature setpoint has been modified.
If the SOAK time is not long enough, this time can be increased. To do this, double click on the line with the SOAK Opcode. The Edit Step box will appear.
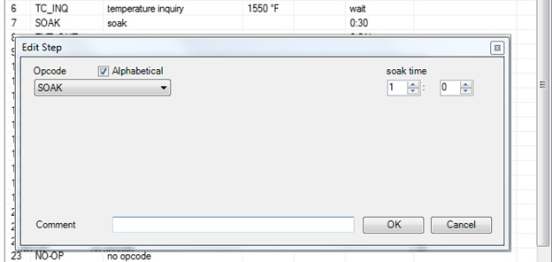
Under the Soak Time in the upper right hand corner, there are two numeric entry boxes. The left most numeric entry box is for time in hours. The right most numeric entry box is for time in minutes. To modify these times, either the Up or Down arrows can be pressed, or the desired time can be entered into the boxes from the keyboard. Once the correct time has been entered, press the OK button in the bottom right corner of the Edit Step box.
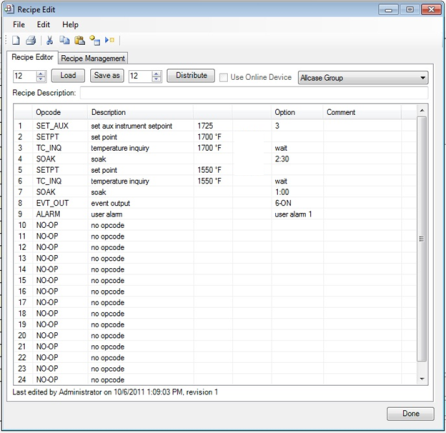
Here, SOAK time has been modified.
If this Recipe is now correct, it is time to save this recipe. There are two options for doing this.
-
To permanently save Recipe #12 with the modifications, click the Save As button. A pop up box will appear if there is a recipe already saved to the existing recipe number (if there is no recipe saved to that number, the pop up box will not appear).
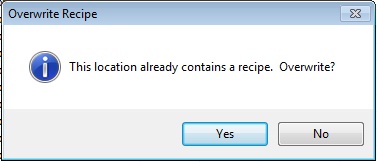
To permanently modify Recipe #12, click the Yes button.
-
To save the modified recipe as a new recipe number, in the Save As numeric entry box,
 press the Up or Down arrows, or enter in the desired recipe number. Once the appropriate recipe number has been selected, click the Save As button (a pop up confirmation box may appear; if it does, simply choose “Yes” to overwrite the existing recipe). The mouse pointer on the screen will change to a Busy pointer
  as the recipe is saving.
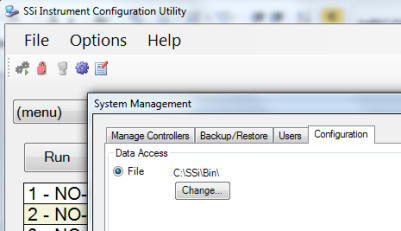
IMPORTANT: The recipe will be saved to the folder defined under Settings à Configuration à Data Access. In order to save the recipe to the controller, you must first be logged into the controller using the login (
 ) button.
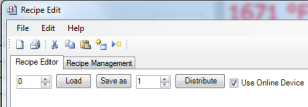
Second, when the Recipe Edit window is open, “Use Online Device” must be checked in the window before the recipe is saved.
Once the mouse pointer returns to normal, click the Done button at the bottom right hand corner of the Recipe Editor box.

Now that the recipe has been modified completely, or a new recipe has been built, the operator can Log Out by again clicking the padlock icon. After successfully logging out, the padlock icon will change back to a blue color. Exit Configurator by clicking the “X” button at the top right corner of the screen, or by clicking File à Close at the top left corner of the screen.