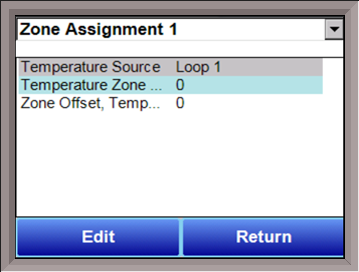
Zone Assignments

WARNING: This screen should not be changed without consulting SSi at 513-772-0060.
*Client Instrument Setup must be configured prior to Zone Assignment setup
The zone assignment feature allows the Series 9220 program to change set points on all instruments of a multi-zone furnace. The Series 9220 has up to five temperature zone assignments available (Zone Assignment 1 – Zone Assignment 5). Typically, the first zone is configured to the programmer’s temperature instrument. That is the master set point that will be propagated to the other configured zone instrument set points on set point change. For example, the user may want to set 4 temperature zones from a recipe where the programmer temperature instrument is loop 2. In this case, zone 1 would be configured as loop 2. Subsequent zones would be configured as previously configured Client temperature controllers.
If the ZONE_OFF (Zone Offset) opcode had been used in the program, the set point sent to the specified zone instrument would have the offset added. For example, a 3-zone pit furnace, where the bottom zone usually has a higher set point. The middle zone and the top zone usually have a lower set point. The bottom zone temperature controller is assigned to zone 1, the middle temperature controllers to zone 2, and the top zone controller to zone 3.
If the first three steps of a program are as shown below, then the bottom zone set point is 1775, the middle zone is 1750, and the top zone is 1800.
|
Step |
Opcode |
Temperature |
|
Option |
|
1 |
ZONE_OFF |
25 |
|
Zone 1 |
|
2 |
ZONE_OFF |
50 |
|
Zone 3 |
|
3 |
SETPT |
1750 |
|
|
The first step sets the offset for zone 1 to 25 degrees; therefore, the bottom zone controller would be sent a set point of 1775 when step 3 is executed. Likewise step 2 sets the offset for zone 3 to 50 degrees. The top zone then receives a set point of 1800. The middle zone controller would receive the 1750. The temperature controller displayed on the Status Display is instrument #2. If instrument #2 were the top zone controller then the Status Display would show the 1800-degree set point. The offset is discarded when the program ends. The default value is reloaded by the programmer when the user starts a new program.
When using the multi-zone offset feature, the temperature controller assigned as instruments 1 and 2 should be in zones that will not be offset.
Temperature Source
This will allow the user to set the temperature instrument for the zone assignment. The options are:
|
Loop 1 |
Instrument 6 |
Instrument 14 |
Instrument 22 |
|
Loop 2 |
Instrument 7 |
Instrument 15 |
Instrument 23 |
|
Loop 3 |
Instrument 8 |
Instrument 16 |
Instrument 24 |
|
Instrument 1 |
Instrument 9 |
Instrument 17 |
Instrument 25 |
|
Instrument 2 |
Instrument 10 |
Instrument 18 |
Instrument 26 |
|
Instrument 3 |
Instrument 11 |
Instrument 19 |
Instrument 27 |
|
Instrument 4 |
Instrument 12 |
Instrument 20 |
Instrument 28 |
|
Instrument 5 |
Instrument 13 |
Instrument 21 |
|
Temp Zone Number
This option will allow the user to set the zone number for the assignment. The range is 0 – 5.
Temp Zone Offset
This option will allow the user to enter an offset for the assignment. The range is -4000 – 4000.
Proper configuration of this step will allow the User to accomplish the same offsets as in the original example. For example, if Zone 1 was configured for a Temp Zone Offset of 25 and Zone 3 was configured with a Temp Zone Offset of 50, the Opcode of
|
3 |
SETPT |
1750 |
would produce the same results of set points of 1775, 1750, and 1800, respectively. It is important to remember assignments made within this section will always be applied. Therefore, it should be reserved for applications were Zone Offsets are consistent.