Flash Card Management
This section will show the user how to pull logged data from the operator interface using TS Manager.
From the TS Manager home screen, select Tools à Communications à Advanced Download & Maintenance

The Transfer Data tab is used to download data from the selected touch screen. The specified recorder is identified on the drop down list from the main TS Manager Screen.
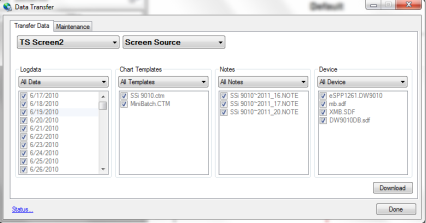
There are 2 ways to synchronize data. This can be done using the Screen as the source of the data (network connection) or Disk source (flash card from the screen). Note: Users can also download data from the main TS Manager screen using the “Download Data” button on the top right corner.
Synchronization will pull all Log Data, Chart Templates, Notes, and Devices that were entered on the screen onto the computer that is running TS Manager. The data will be stored in the TSManager directory under the screen name.
Log Data – Users can use the drop down list to select: All Data, Selected Data, or Skip. The check boxes are used to select which data gets included for the download when the Selected Data is selected, or which data gets skipped when the Skip option is selected.
Chart Templates – User can use the drop down list to select: All Templates, Selected Templates, or Skip. The check boxes are used to select which templates get included for the download when the Selected Templates is selected, or which templates get skipped when the Skip option is selected.
Notes - User can use the drop down list to select: All Notes, Selected Notes, or Skip. The check boxes are used to select which notes get included for the download when the Selected Notes is selected, or which notes get skipped when the Skip option is selected.
Devices – Users can use the drop down list to select: All Device, Selected Device, or Skip. The check boxes are used to select which devices get included for the download when the Selected Device is selected, or which devices get skipped when the Skip option is selected.
The Download button  is used to start the synchronization process.
Note: A file that is downloaded will overwrite any existing file.
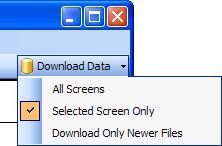
Download Data button on TS Manager main screen.
Clicking on the down arrow will give the user the ability to: download data from all of the touch screen definitions, download data from the selected screen, only download newer files. Clicking on the button will begin the download progress.
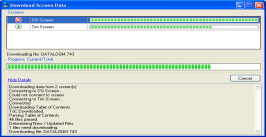
If there are multiple screens, then each screen will be displayed along with the progress of each download. Clicking on the “Show Details” link will expand the screen and show any download details. The link will then say “Hide Details”, which will shrink the screen and not provide any details. If there are any errors with downloading, then there will be an “X” next to the screen with the issue. The error will be listed in the details section. If the download is successful, then the download screen will close when the download is finished.
Flash Card Synchronization
When synchronizing from a flash card, the flash card needs to be retrieved from the touch screen. The screen should be turned off before pulling the flashcard.
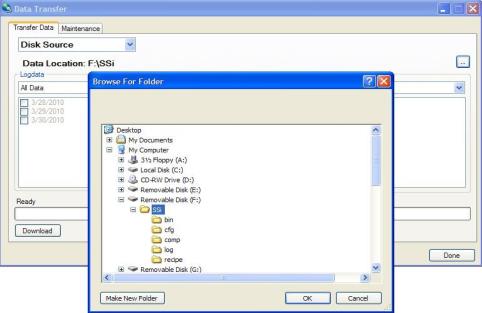
The storage location of the flash card should be selected using the period button on the Data Transfer screen’s Transfer Data tab. Note: The main location for the flash drive should be selected.
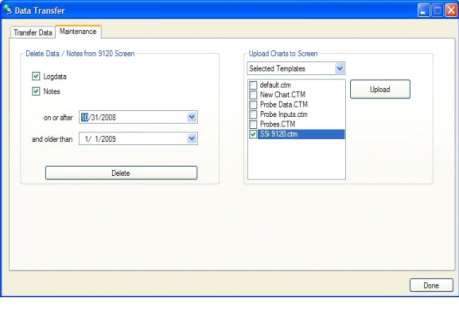
The Maintenance tab is used to delete logged data or notes either from the video screen directly or on the flash card. Logged data and notes can be removed to create additional free space on the storage card. All data that is synchronized with TS Manager maintains a backup of the data in the ..TSManager\TSScreens\“Screen Name”\Log, Clog and notes directories.
To delete the log data, select the “Logdata” option, and to delete the notes, select the “Notes” option. One or both options may be selected at the same time. The data will be deleted by a date range, which means the user will have to select a beginning date for the date range and an ending date for the date range. The “on or after” drop-down list is the beginning date for the date range, and the “and older than” drop-down list is the ending date for the date range. Clicking on the Delete button will delete the selected files from the screen. The user will have to confirm the delete. The user will also be able to upload chart files to the instrument. In the “Upload Charts to Screen” section, the drop-down list has the options for “All Templates” or “Selected Templates”. Click on the Upload button to upload the desired chart files. This feature is useful if the user modifies the chart files on the local computer and wishes to update the chart files on the touch screen without having to enter the modifications again.
The Done button will close out the screen.