(menu)

The Menu option will allow the user to control the recipes that are on the 9210 Nitrider.
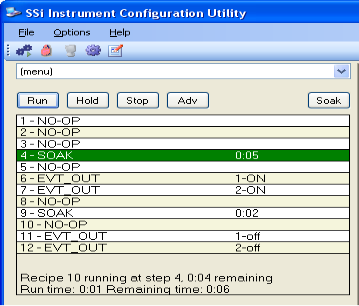
The area right below the drop-down menu list allows the user to start, stop, hold, or resume a recipe.

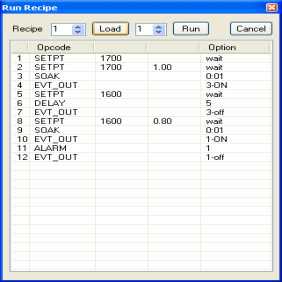
Clicking on the Run button will display the Run Recipe screen, from which the user can select the recipe to run.
Use the number box next to the “Recipe” text to select a recipe number from 1 to 300. Once the recipe number has been selected, click on the Load button. This will display the steps in the recipe in the white area. If the user wants the recipe to start from a step other than step 1, the user can select which step from the number box to the right of the Load button. The user can edit the steps in the recipe just like in the Recipe Management screen. Note: This is an edit-once type of edit, and the changes won’t be saved to the 9210. Once the recipe number and the starting step number have been chosen, the user can click on the Run button. This will begin the recipe. If the user does not wish to run the recipe, clicking on the Cancel button will close the form without starting the recipe.
While a recipe is running, there will be a green highlight across the program display area.

The Hold button will put the recipe on hold, but it will not stop the recipe. To hold a recipe, click on the Hold button. The user will have to confirm the action.
Clicking on Yes will hold the recipe, and clicking on No will not hold the recipe. Once the program has been held, the Hold button will say Cont, there will be a yellow highlight across the program display.
To continue the recipe, click on the Cont button. The user will have to confirm the action
Click the Yes button to continue the recipe. Click the No button to leave the recipe in hold. Once the recipe has been continued, the green highlight will return and the Cont button will say Hold.
To stop the recipe, click on Stop. This will display a message box confirming the action.
Clicking on Yes will stop the program and clicking on No will cancel the action.
The ADV button will allow the user to advance to the next step in the recipe. The user will have to confirm the action.
Clicking on the Yes button will advance the recipe to the next step, while clicking on the No button will cancel the advance.
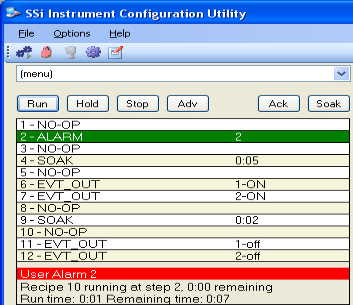
If there is an alarm of any kind, the alarm text will be displayed at the bottom of the program display area with a red highlight, and the Ack button will become visible.

Clicking on the Ack button will acknowledge the alarm. Once the alarm has been acknowledged, the Ack button will disappear, and the alarm text will disappear as well.

The Soak button will allow the user to manually change the length of a soak time. To do this, click on the Soak button. Note: The recipe must be in a soak step for this button to be enabled. This will display the Soak Timer dialog box.
The current soak time will be displayed initially. To set a new soak time, change the hours and/or minutes to the desired values and click on the Set button. Note: This change will only last for the current soak and will not be a permanent change. To cancel the change, click on the Cancel button.