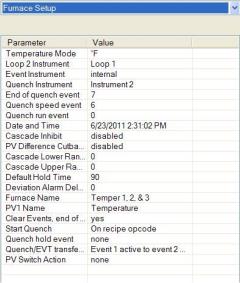
Furnace Setup

The Furnace Setup menu option is an administrative access only option. Do not make any adjustments on the screen without first contacting Super Systems, Inc. at 513-772-0060. Note for controllers with Cascade control: When in cascade mode, the 9xxx treats loop 2 as the furnace loop and loop 3 as the load loop. It feeds the output of the load loop into the set point of the furnace loop.
Temperature Mode
This value determines the specific temperature scale to be used. It can be either Degrees ° or degrees °.
Loop 2 Instrument
The option will allow the user to select the instrument that will serve as the Loop 2 instrument. The options are: Internal Loop 1 – Internal Loop 3, Instrument 1 – Instrument 25.
Event Instrument
Allows for a Client instrument (or internal) to be the defined event control device. The types of instruments are: Internal, Instrument 1 – Instrument 25.
Quench Instrument
Allows for Client instrument (or internal) to be the defined quench control device. The types of instruments are: Internal Loop 1 – Internal Loop 3, Instrument 1 – Instrument 25.
End of Quench Event
Tells the programmer which event to signal end of quench (related to which relay it is assigned). The list of possible values is: 0 – 14.
Quench Speed Event
Tells the programmer which event will signal the quench speed. The list of possible values is: 0 – 14.
Quench Run Event
Tells the programmer which event will signal quench run. The list of possible values is: 0 – 14.
Date and Time
This value is the current date and time on the 9130 vacuum controller only (not the local computer or the touch screen, if applicable). Clicking on the “Value” column will allow the user to set a new date and time on the controller. Note: The date and time of the touch screen can be changed (if necessary) by selecting the date and time in the lower right corner on the touch screen under the menu. This can be reached by going through the menu, and shutting down the software. Then, at the CE screen the date and time can be changed by double taping the time in the bottom right corner and setting it, then select “apply”. For this to take effect the screen needs to be rebooted; on the older TPC 642 displays the registry needs to be saved under TPC Configuration icon, the Misc Tab and then reboot the touch screen. The date and time that is recorded on the flash card (and therefore the datalog data) is the date and time of the Advantech display not the controller.
Cascade Inhibit
Note: This field is only applicable if the controller is in Cascade mode. This will turn cascade control on or off. When inhibit = enabled, the 9130 functions as a multi-loop controller with three control loops. The options are: enabled or disabled.
PV Difference Cutback
Note: This field is only applicable if the controller is in Cascade Mode. This is used with the Cascade Lower Range EOPV and Cascade Upper Range EOPV to limit the absolute % output of the furnace loop. This will turn the PV difference cutback feature on or off. The options are: enabled or disabled.
Cascade Lower Range EOPV
Note: This field is only applicable if the controller is in Cascade Mode. This is the cascade lower range end of PV difference. This is used with the PV Difference Cutback and Cascade Upper Range EOPV to limit the absolute % output of the furnace loop. Between the lower range EPOV and the upper range EOPV, there is a linear interpolation from 0 to the loop 2 output maximum (usually 100 %) that determines the maximum % output for the furnace loop. The range is -300 to 10000.
Cascade Upper Range EOPV
Note: This field is only applicable if the controller is in Cascade Mode. This is the cascade upper range end of PV difference. This is used with the Cascade Lower Range EOPV and PV Difference Cutback to limit the absolute % output of the furnace loop. Between the lower range EPOV and the upper range EOPV, there is a linear interpolation from 0 to the loop 2 output maximum (usually 100 %) that determines the maximum % output for the furnace loop. The range is -300 to 10000.
Default Hold Time
This value is the default holding time for the furnace. The range is 0 to 10000.
Deviation Alarm Delay
This value is the delay for the alarm if a deviation alarm is detected. The range is 0 to 10000.
Furnace Name
This is the name of the furnace.
PV1 Name
This is the name of process variable 1.
Clear events/end of recipe
This switch will allow the user to clear the events out at the end of a recipe. The options are either no or yes.
Start Quench
This option will determine what starts the quench cycle. The options are: On Recipe Opcode (QUENCH Opcode), Input 1 – Input 31.
Quench Hold Event
This option will determine which event will hold the quench cycle. The options are: None, Input 1 – Input 14.
Quench/EVT Transfer Time Configuration
This option will allow the user to set what will trigger the transfer from the quench cycle. The options are: Event 2 Active Time, or Event 1 Active to Event 2 Active.
PV Switch Action
This field will select the action for the PV switch. When an instrument in configured for PV switching, the controller will use the “low” source when the PV signal is below the PV Switch Value; and it will use the “high” source when the PV signal is above the PV Switch value. The list of options is:
None
PV Switch
TC Redundancy
Cascade Control