Configuration
This option will allow the user to set some general configuration settings. The list of configurable items is:
-
Log Maintenance
-
Alarm Text
-
Event Text
-
Compact Database
-
Screen Communications
-
Datalogging Setup
-
Appearance
-
Recipe Configuration
-
MiniBatch (If MiniBatch has been activated)
-
Product Activation
-
Repair Database
-
Time Synchronization
-
Backup/Restore
-
Read/Write Data
-
Language
-
Load TC Map
-
Chart Settings
Log Maintenance
This option will allow the user to purge, or delete, log files, starting from a specific date. All log files from on or before the selected date will be purged. The user can purge log files from the Alarm Log, Event Log, or System Log.
Alarm Text
This option will allow the user to modify the text for Programmer Alarm 1 – Programmer Alarm 99. Programmer alarms are internal, non-modifiable alarms that are triggered when there is a certain condition in the 9010 programmer. The text for the programmer alarms can be modified to more accurately describe these conditions. User Alarm 0 is not an alarm; it is used to turn off a user alarm. It functions the same way as the acknowledge button.
Event Text
This menu option will allow the user to configure the text for the input and output events for the 9010. Select whether to edit the Input events or the Output Events. Note – The list of events can take a few seconds to load. The screen will refresh after the list has been loaded. There are a total of 7 input events, and 15 output events. Highlight the event to be changed and click on the Edit button. This action will display the on-screen keyboard, which will allow the user to modify the event text. To save the changes to the event text, click on the Save button. Clicking on the Return button will not save any of the changes made. Note – Clicking on the Save button will not close the Edit Event Text screen.
Compact Database
This menu option will automatically compact the DW9010DB.sdf database. This database will keep track of all of the alarms, events, recipes, and system events that occur on the 9010. When records are added, space is reserved in the database table for the maximum amount of characters, regardless of the actual number of characters in the record. Once the record is added, this space is not released. Instead, it will still be associated with the record, thereby adding to the total disk space and slowing down the communication time with the database. Compacting the database will free up this extra space, which will speed up the amount of time it takes the software to communicate with the database.
Screen Coms
This menu option will allow the user to determine how the Touchscreen will communicate with the 9010 instrument. The settings are based upon the DIP switch settings on the back of the screen. A 3.5” uses one connection. On a 5.7” screen comm1 = 232 and comm3 = 485. On a 12.1” screen comm1 = 232 and the port labeled 232/422/485 = 485.
The Media option will be the type of connection the Touchscreen is using to connect to the 9010. The options are:
-
COM1 = (232)
-
COM2
-
COM3
-
COM4 = (485)
-
Ethernet
If COM1 through COM4 is selected, the user will have to set the Address and the Baud rate as well. If Ethernet is selected, then user will have to enter the IP address of the 9010 instrument.
The Address option is the slave address of the 9010 instrument for the COM port communications, or the Ethernet IP address for Ethernet communications. For the COM port communications, the address will range from 1 to 250. For Ethernet communications, the address must be supplied in a 999.999.999.999 format, or it will not be accepted.
The Baud option is the baud rate for the COM port communications. The options are:
-
1200
-
2400
-
4800
-
9600
-
14400
-
19200
-
28800
-
38400
-
57600
-
76800
-
115200
Datalogging Setup
Note – Contact Super Systems before making any changes on this screen, since any changes made can have an adverse effect on the data being displayed.
This menu option will allow the user to modify which registers in the 9010 will be used as datalog data.
This list of data values is shown at the top of the screen.
Click on the Add button to add a new set of data values, or click on the Edit button to edit an existing set of data values. Click on the Delete button to delete a set of values. To add or edit data values, enter the initial offset of the register, as well as the number of sequential registers to read for. Clicking on the Save button will save the new data value registers. Note – The Save button must be clicked on to save any changes to the datalog data, including resetting the configuration. Clicking on the Cancel button will cancel the action. Clicking on the Reset button will reset the values to the original configuration. Note – any changes made to the data values will need a restart of the application before those changes will take effect. Clicking on the Descriptions button will display any descriptions for the data values. The default description for a data value is the data value’s register. So the default description for data value 25007 is “25007”. Changing this to “Temperature”, for example, would make it more descriptive. Register 25007 holds the actual temperature value for the 9010.
To add a new description, click on the Add button. To insert a new description, click on the Insert button. To delete a description, click on the Delete button. To edit an existing description, click on the Edit button. The Add or Insert feature will only create valid descriptions if there are existing data values without descriptions. Click on the OK button to save the description changes. Click on the Return button to cancel any changes and return to the previous screen.
Appearance
This option allows the user to assign Custom Text to Loops 1 and 2 for the touchscreen display interface. Select the appropriate blue box to enter custom text.

Recipe Configuration
Using this screen, operators can give names to recipes for easy access. The operator must first choose “Recipes on device access by name” from the drop down menu. Next, select the Maintain Recipes button. This screen will allow the operator to Edit and name recipes. Recipes can then be found by name under Recipe Edit.
Each recipe name must be set up with a recipe number in order to be viewable in SSi Configurator. If recipes are set up by name only in Recipe Configuration, you will not be able to view these recipes in SSi Configurator.
The Compact Database button will compact the mb.sdf database file that is located on the Touchscreen. When records are added, space is reserved in the database table for the maximum amount of characters, regardless of the actual number of characters in the record. Once the record is added, this space is not released. Instead, it will still be associated with the record, thereby adding to the total disk space and slowing down the communication time with the database. Compacting the database will free up this extra space, which will speed up the amount of time it takes the software to communicate with the database.
MiniBatch
When MiniBatch is activated, the setup for each of the parts – Maintain Recipes, Maintain Parts, Maintain Users, and Administration – can be accessed through the “Configuration” menu. At least one recipe, part, and user must be set up before MiniBatch can be used through the 9010 Touchscreen. Note – When MiniBatch is not activated, this menu option will be hidden, and the Recipe Configuration option will be visible.
See the section Appendix C – Using MiniBatch with the 9010 Touchscreen for instructions.
Product Activation
This option will allow the user to activate the MiniBatch application for the 9010 controller. An activation code will be required to activate the software. Once MiniBatch has been activated, the MiniBatch button will be visible on the main Configuration screen. MiniBatch can also be deactivated from this option.
Repair Database
This feature will make attempted repairs on all SQL databases associated with the screen. Clicking the Repair Database button will display a timer icon while the repair is taking place.
Time Synchronization
This option allows the user to set up the touch screen to sync the system time with an Internet-based time server.
Backup/Restore
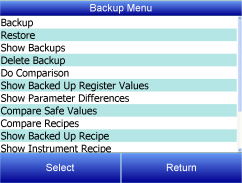
This option allows users to create and restore backups, and provides the ability to change backup settings.
Note: Backups are stored in a SQL database under the DW9010 folder. The default filename is Backups9010.sdf
The Backup Menu contains the following options:
Backup

The 9010 Backup feature is set to a default of 300, meaning that 300 recipes will be backed up. This number can be adjusted (e.g. if fewer recipes are being used and a faster backup is needed). To do so, tap “Recipes to Back Up” and then tap “Edit.”
NOTE: Only recipes that are backed up will be used for comparison or restore. For example, if 10 recipes are backed up, then recipes 11-300 will not be processed.
Tap “Start” to begin the backup.

The 9010 will display progress updates as the backup proceeds. Tap “Stop Backup” to stop the backup at any time. When the backup is complete, tap “Close.”
Restore

“Restore” will restore a backup to the connected instrument.
Select “Recipes to Restore” and tap “Edit” to change the number of recipes if necessary.
By default, the 9010 will preselect the oldest backup along with 300 recipes. To restore a different backup, tap the “Backup ID” and then tap “Edit.”

Backups will be ordered from most recent to oldest. By default, the last week of backups will be displayed. To adjust this, use the date buttons at the top of the list to adjust the From/To parameters.
Tap a backup and then tap “Show Detail” to see additional information about the selected backup (for additional information, see the “Show Backups” section below). Tap “Select” when the desired backup has been chosen.
Once the desired backup has been selected and the “Perform Restore” is again displayed, tap “Start” to restore the backup to the 9010.
NOTE:
-
The restore routine will try to communicate with the 9010 as-is.
-
If it receives no response it will attempt to communicate using COM1 (RS-232), 19200 baud and 250 Modbus address.
-
If there is no answer on COM1, restore will try to communicate using COM2 (for 12.1" screens) or COM3 (for 5.7" screens), 19200 baud and 250 address.
-
If there is no answer on the RS-485 port, restore will attempt to communicate using the settings from the backup (any port or ModbusTCP).
-
If the 9010 doesn't answer the restore will stop and the message "Could not read, restore failed" is displayed.
-
If communications are successful the restore process continues.

The progress of the restore will be displayed. When the restore is finished, tap “Close.”
Show Backups
This feature allows the user to see and search the available backups and view detailed information on each.
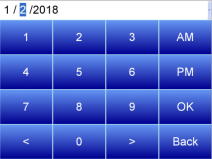
Tap a backup and then tap “Show Detail” to see additional information about the selected backup.
Backups will be ordered from most recent to oldest. By default, the last week of backups will be displayed. To adjust this, use the date buttons at the top of the list to adjust the From/To parameters.
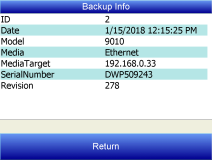
ID is the database's backup ID
Date is the date and time the backup was taken.
Model is the instrument model.
Media is the media used at the time of the backup (Serial or Ethernet)
MediaTarget is the target (IP address if Ethernet, Modbus address, com port and baud rate if serial).
SerialNumber is the serial number of the device
Revision is the firmware revision of the device.
Delete Backups

This feature allows the user to delete a backup from the database.
The selection process and navigation are the same as that found in the Show Backups menu. Once a backup is selected, tap “Select” to delete the backup. You will be asked to confirm your selection before the backup is deleted.
Do Comparison

This feature allows the user to compare two backups, or to compare a backup to the connected instrument.
NOTE: This feature compares configuration data only. It does not compare recipe data.
Tap the appropriate comparison type, then tap “Select.”
If running the “Compare Instrument and Backup” option, backups on the ensuing selection screen will be ordered from most recent to oldest. By default, the last week of backups will be displayed. To adjust this, use the date buttons at the top of the list to adjust the From/To parameters.
Tap a backup and then tap “Show Detail” to see additional information about the selected backup. When ready to do a comparison, tap “Select.”

A report will then be generated detailing the differences between the backup registers and the instrument.
If running the “Compare Two Backups” option, select a backup to be designated Backup ID 1, and another to be Backup ID 2, then tap “Start” to compare. A report will be generated detailing the differences between the two backups.
Show Backed Up Register Values

This feature allows the user to select a range of register values from a backup and display the corresponding value and description.
Backups will be ordered from most recent to oldest. By default, the last week of backups will be displayed. To adjust this, use the date buttons at the top of the list to adjust the From/To parameters.
After selecting a backup, tap “Start Register” and then “Edit” to set the starting register for the report. Tap “End register” and “Edit” to set the ending register for the report. Tap “Start” when ready to begin.
Show Parameter Differences
This feature allows the user to compare the valid parameters between two 9010 revisions and display the differences in a report.
Tap “Parameters in revision” and then “Edit” to set the first data source for the report. Tap “but not in revision” and “Edit” to set the second data source for the report. Tap “Start” when ready to begin.
In this example, the report will look for parameters that are in in revision 278, but not in revision 200:

Compare Recipes

This feature allows the user to show the recipe numbers that differ between a backup and the instrument, or between two backups.
If running the “Compare Instrument and Backup Recipes” option, backups on the ensuing selection screen will be ordered from most recent to oldest. By default, the last week of backups will be displayed. To adjust this, use the date buttons at the top of the list to adjust the From/To parameters.
Tap a backup and then tap “Show Detail” to see additional information about the selected backup. When ready to do a comparison, tap “Select.”
Tap “First Recipe Number” and then “Edit” to set the first recipe number. Tap “Recipe Count” and “Edit” to set the number of recipes to compare. Tap “Start” when ready to begin.

If running the “Compare Two Backups” option, select a backup to be designated Backup ID 1, and another to be Backup ID 2. Tap “First Recipe Number” and then “Edit” to set the first recipe number. Tap “Recipe Count” and “Edit” to set the number of recipes to compare. Tap “Start” when ready to begin.
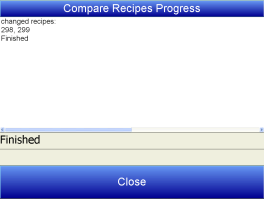
The report will show which recipes have been changed:
Show Backed Up Recipe
This feature allows the user to display a selected recipe from a selected backup. Using the navigation options outlined in the previous Backup/Restore sections, select a Backup and Recipe ID to display the details of that recipe:

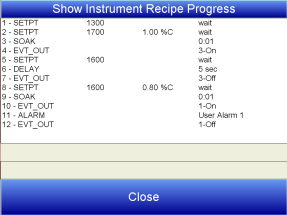
Show Instrument Recipe
This feature allows the user to load a selected recipe from the instrument and display it. Using the navigation options outlined in the previous Backup/Restore sections, select a Backup and Recipe ID to display the details of that recipe:
Restore Serial Communications
This feature writes the serial communications values for RS485 host, RS485 slave 1 and slave 2, RS232 host, PLC type and 9010 Modbus address from the selected backup to the 9010. The original touch screen interface communication settings are also restored from the backup to the screen. The screen must be wired and configured just as it was at the time the backup was made. The routine tries various ports and media to communicate. If communications can be established, the feature will restore the registers and settings to the instrument.

Using the navigation options outlined in the previous Backup/Restore sections, select a Backup and tap “Start” to restore communication setups:
Check Current Communications

This feature displays the touch screen communication settings and whether the screen can communicate with the 9010.
Load TC Map

Load TC Map allows the user to select which Load TCs will be available when using the LTC_SET opcode. Only those TCs selected on this screen will appear as an option when using the opcode. See the description of the LTC_SET opcode for more information.
Chart Settings

Chart Settings allows the user to set the default display behavior of the trend chart, specifically in regards to the cursor. See the Chart section for details on the display chart feature.
Read/Write Data
This menu option is protected by the SSi special passcode. Contact SSi at 513-772-0060 to obtain this passcode before making any changes.
This menu option allows unfiltered access to the internal registers and is used for troubleshooting only
Language
This menu option allows the user to select the display language of the touchscreen interface.