Appendix C – Using MiniBatch with the 9010 Touchscreen
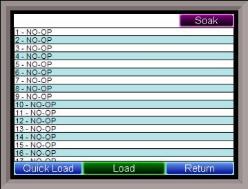
When MiniBatch is in operation, the Recipe screen off of the main status display will now have a new button labeled Quick Load. Quick Load will load up one of the MiniBatch recipes set up without actually creating a corresponding load record. This would be used if the user wanted to run a recipe without creating a new load for the recipe.
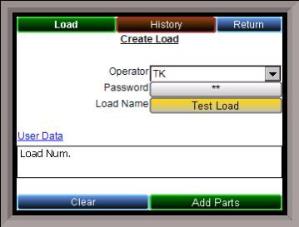
Clicking on the Load button will launch the MiniBatch application. Note – MiniBatch can only run one recipe at a time. The buttons at the top of the screen will display the new load screen or the currently running load screen (Load), or the load history (History). The Return button will close down MiniBatch and return to the Recipe screen.
To begin, the user will have to select a user that has been set up, enter the password, then give the load a meaningful name. Once this has been done, parts can be added to the load by clicking on the Add Parts button.
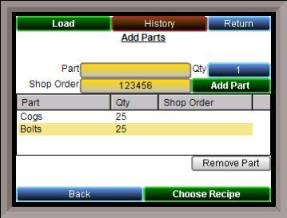
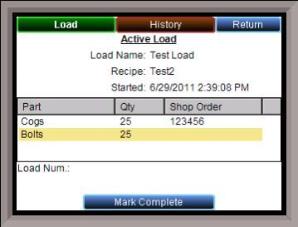
Click on the button next to the “Part” label to select parts that have been set up. Once a part has been selected, the quantity of the part can be changed by clicking on the button next to the “Qty” label. The shop order can be added for the part by clicking on the button next to the “Shop Order” label. Once the appropriate part, quantity, and shop order have been selected, click on the Add Part button to add the part to the list. Only parts in the list will be considered part of the load. Add as many parts as desired. Note – A shop order must be entered for each part. To remove a part from the list, and therefore, the load, select the part in the list and click on the Remove Part button. Once all of the parts have been selected, click on the Choose Recipe button to select the recipe to run. The user can select the recipe to run and even preview the recipe to verify that it is the correct recipe desired. If the recipe is correct, then click on the Start Load button to start the recipe and add the load record to the database. The active load screen will be shown, with a summary of the load composition, as well as when the load was started. The load will not be marked complete when the recipe ends, so the load will need to be manually marked as complete. Clicking on the Mark Complete button will mark the load a finished.
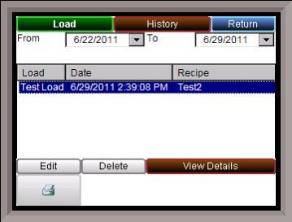
Any completed loads can be viewed on the Load History screen, which is accessed by clicking on the History button at the top of the screen.
The loads for the given time frame will be listed in the list. The time frame can be changed by clicking on the down arrow next to the “From” or “To” dates. Note – There is no refresh, so the user will have to click on the Load button, then click on the History button for the history to list all of the loads for the new time frame. Select a load to be able to alter it.
Clicking on the Delete button will allow the user to delete a specific load record. A record must be selected before it can be deleted. This will be helpful if the database is getting too full, or too many records are displayed on the screen and the loading time is pretty long
The features of the Edit button have not yet been implemented.
To print, the touch screen must be connected to a MiniBatch server PC, and the printers can be selected from that PC.
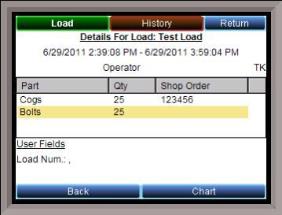
Clicking on the View Details button will display the parts in the load, along with the operator who started the load and the time that the load ran. Any additional user fields will also be displayed. From this screen, clicking on the Chart Button will display the chart screen for the specific load and only for the load’s run time (Start Time – End Time).